Tab Dashboards and Themes
The "Dashboards and Themes" tab is, so to speak, the start page of the Dashboard module. New dashboards can be created here and existing ones can be opened in edit mode. Since NeuroomNet version 2023.3, so-called themes can also be defined, edited, and assigned to dashboards here.
Page Layout / Vertical Sections
The "Dashboards and Themes" tab of the Dashboard module is divided into 4 vertical sections:
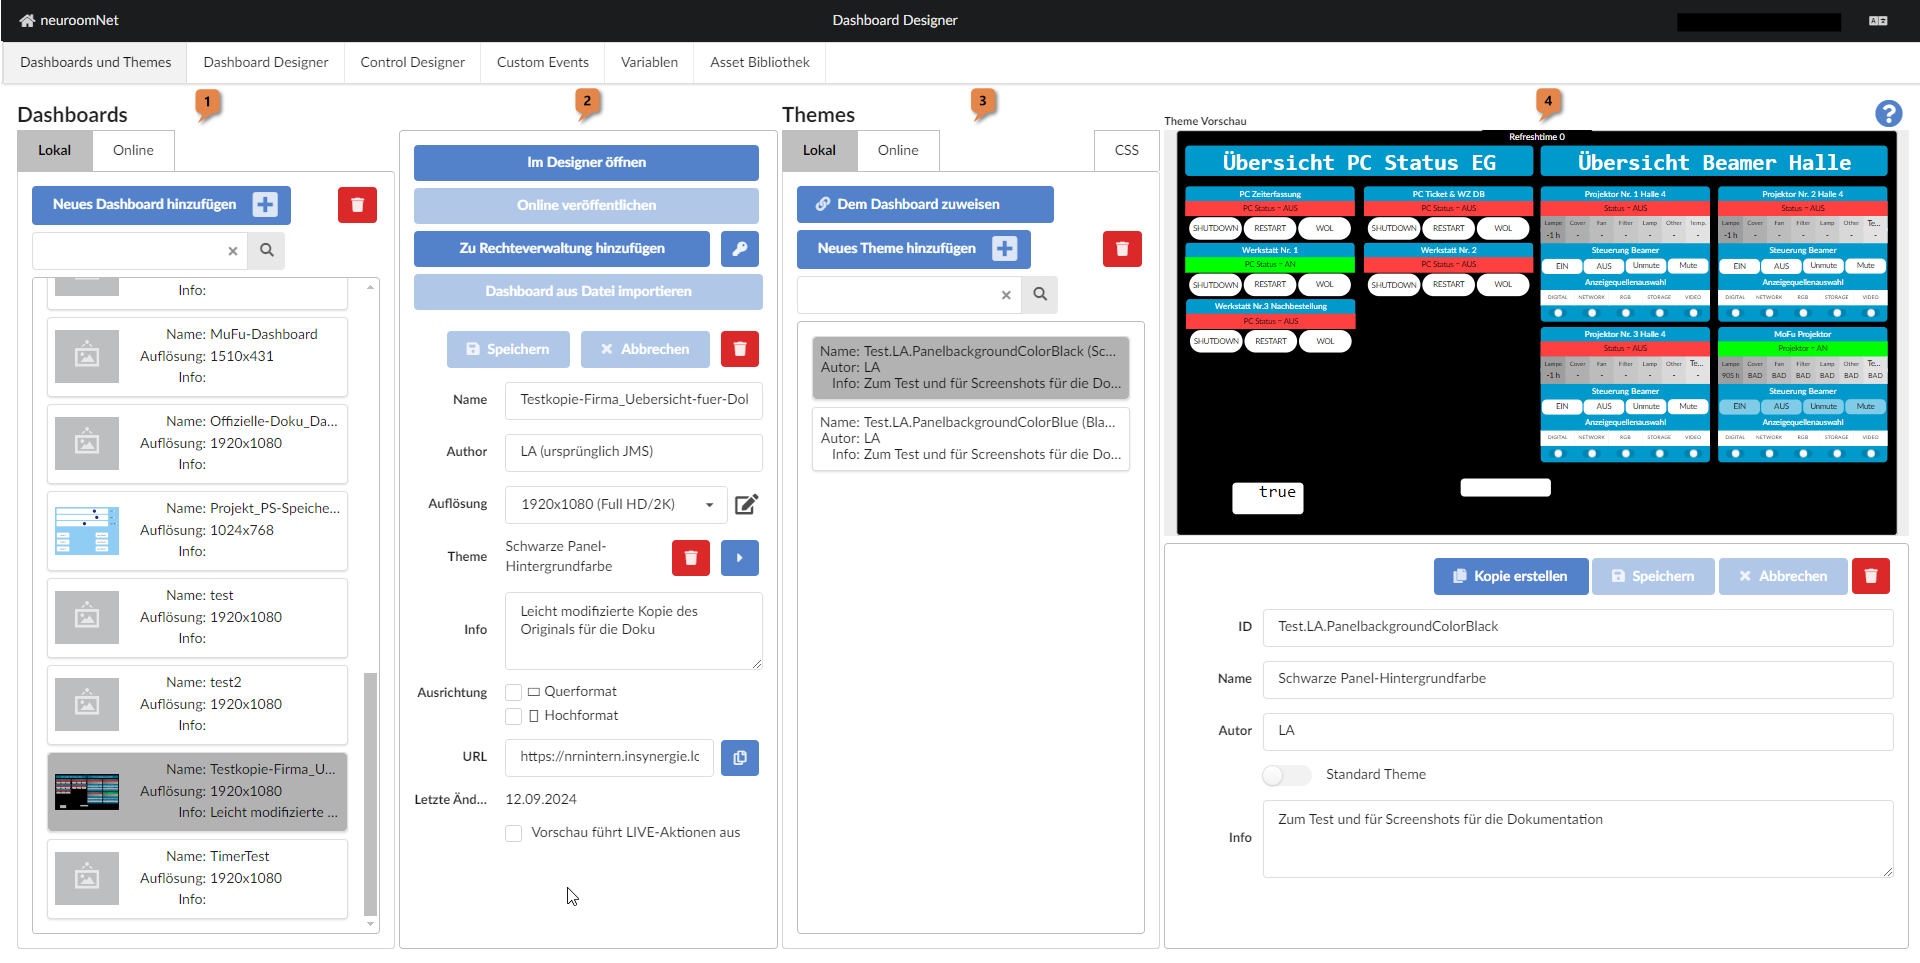
The two left vertical sections 1 and 2 deal with dashboards, and the two right sections 3 and 4 deal with so-called themes, which can be assigned to dashboards.
Left Columns: Dashboard Management
In the left section 1 the following can be done using the corresponding controls:
- Adding a new dashboard ("Add new dashboard", enter corresponding values in the centre-right section and click "Save" there)
- Selecting an existing dashboard in the list on the left (click the corresponding dashboard on the left)
- Deleting the currently selected existing dashboard (trash bin button)
- Filtering (text input field and magnifying glass button)
By default, the dashboards available in your own NeuroomNet installation are displayed here. Using the "Online" button, dashboards available in the NeuroomNet cloud can also be displayed (and e.g. exported and imported locally).
The following information / attributes for the currently selected dashboard appear in the centre-left section 2:
- Name: Name of the dashboard. This must not contain whitespace or other characters that cannot be part of a web URL (this name is part of the dashboard URL, see the URL field)
- Author: Author of the dashboard (free text, optional)
- Resolution: Resolution of the dashboard
- Theme: Name of the assigned theme (or empty / optional)
- Info: Informative description of the dashboard (free text, optional)
- Orientation: Specifies whether the layout was designed for landscape or portrait format
- URL: URL of the dashboard on the intranet. This URL can be used to access the dashboard via a web browser. It is automatically generated from the domain of the NeuroomNet start page and the name of the dashboard.
- Last modified: Timestamp of the last save with modifications (set automatically)
- Preview executes LIVE actions: If this checkbox is set, all actions (usually onClick actions such as custom, group, or variable actions) are executed when activating a dashboard control in the test / play mode of the dashboard (in the Dashboard Designer tab). Otherwise the corresponding actions are not executed (background: The test / play mode is primarily for visually testing / styling a dashboard).
In addition, the following actions can be performed for the currently selected dashboard using the buttons in the centre-left section 2:
- Button "Open in Designer": Switches to the "Dashboard Designer" tab with the currently selected dashboard. There the dashboard can be edited (and viewed in test / play mode)
- Button "Publish online": Using this button, which requires special rights, dashboards can be published in the NeuroomNet cloud.
- Button "Add to rights management" and key button: This can be used to restrict access to a complete dashboard to specific user groups only. See Rights concept for dashboards
- Button "Import dashboard from file": A dashboard that was previously exported to a file (via the "Dashboard Designer" tab) can be imported here. This button is only clickable if "Add new dashboard" was previously clicked on the left (i.e. an import does not overwrite existing dashboards).
- Buttons "Save" and "Cancel": Saves or discards the changes made to the currently selected dashboard. After changes to the currently selected dashboard, no other dashboard can be selected without saving or discarding the changes.
Right Columns: Theme Management
The two right columns deal with the management of so-called themes. Themes are, in simplified terms, basic visual settings (such as colours of text, settings for rounded corners, paddings, etc.) that can be applied to dashboards. This way, ideally, a dashboard can be completely restyled by using a different theme (without having to completely recreate the dashboard or edit it in many places). For this to work well, the dashboards must have been created accordingly1.
In the centre-right section 3 the following can be done using the corresponding controls:
- Adding a new theme ("Add new theme", then enter values in the right section and "save")
- Selecting an existing theme in the theme list (click the corresponding theme on the left)
- Editing the selected theme (click the "CSS" tab to add, delete, or edit CSS stylings there)
- Deleting the selected theme (trash bin button)
- Assigning the selected theme to the selected dashboard ("Assign to dashboard")
- Filtering by existing themes (text input field and magnifying glass button)
The right section 4 effectively behaves like the centre-left section 3, only referring to the currently selected theme instead of the currently selected dashboard: Here the attributes of the currently selected dashboard (or one to be newly created) are displayed and can be edited. In addition, the following actions can be performed via buttons:
- Button "Create copy": Creates a copy of the currently selected theme
- Buttons "Save" and "Cancel": Saves or discards the changes made to the currently selected theme. After changes to the currently selected theme, no other theme can be selected without saving or discarding the changes.
- Trash bin button: Deletes the currently selected theme (same as the trash bin button in the centre-right section)
Rights Concept for Dashboards
There are two levels of permissions for dashboards:
- A complete dashboard can be locked for everyone except NeuroomNet users with certain user profiles2
- Individual parts / controls of a dashboard can be locked for everyone except NeuroomNet users with certain user profiles
For 1.: In the Dashboards and Themes tab, 1. can be configured as follows:
- If necessary, create a new rights profile using the "Add to rights management" button3
- Select one or more rights profiles using the key button (a popup with the corresponding selection option opens).
As soon as at least one user profile has been added to the dashboard via the key button, the dashboard is only accessible to users who have been assigned the selected user profile.
For 2.: In the Dashboard Designer tab, individual controls can be assigned to specific user profiles using the key button of individual dashboard controls (see Dashboard Designer tab: Further important functions / functionalities of the Dashboard [Designer].